by Robert | Aug 27, 2014 | Work In Progress
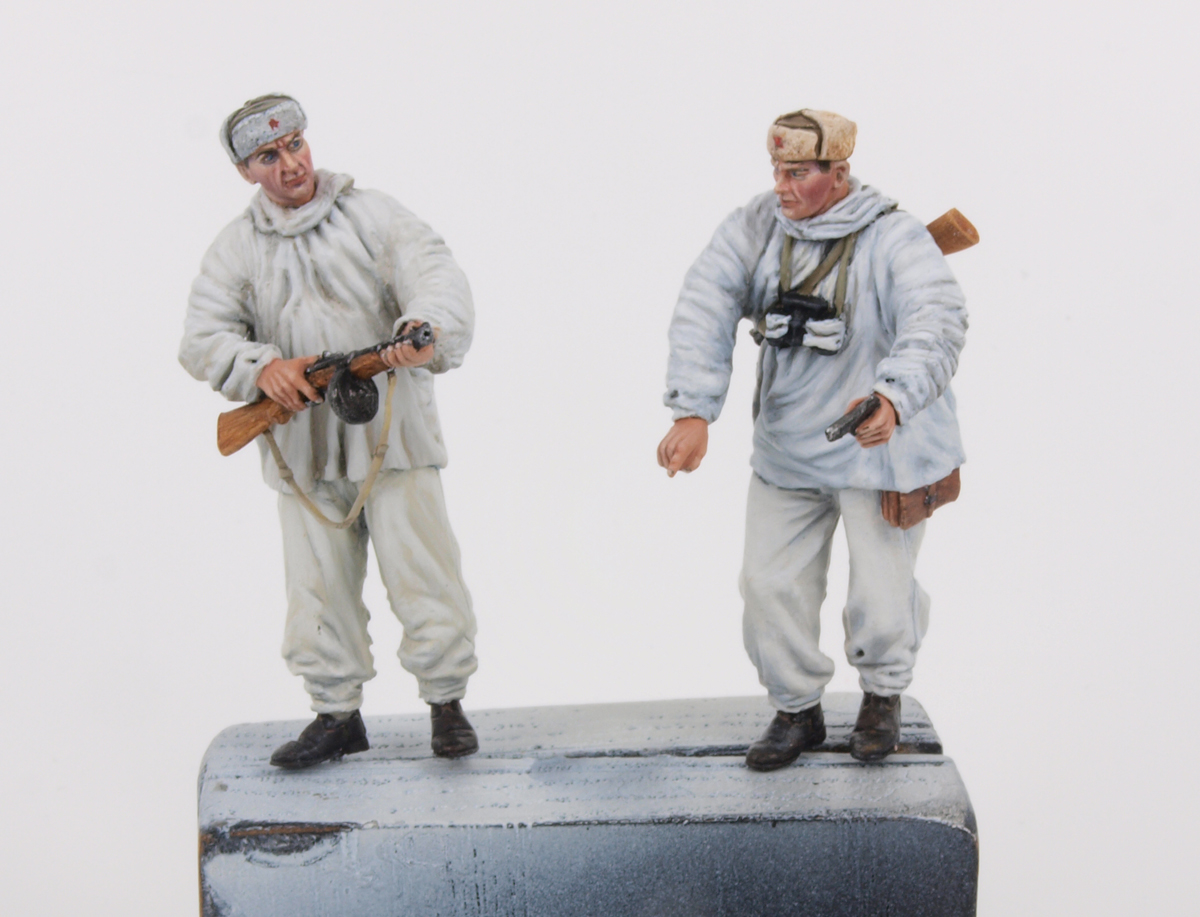
Some time ago I considered that I needed an additional figure for my eternally-in-progress- diorama Snow Crash, and I found a suitable one from the Alpine range. I gave him an Ultracast head and sculpted the hat from Magic Sculp, and a piece of thin wire on top (including a nice knot in 1/35th scale)

This guy will be standing on top of the dio, next to the Aerosan. Just felt a bit more logical that there was a third figure present.
Anyway, here he is, painted in acrylics:


And now for something completely different I take you back to the fallen star of this dio, the Fieseler Storch. During a recent club meeting one of my fellow club members pointed out, in a very polite way, that was I about to make a major mistake using the tail decal the way I did. I followed the instructions 1:1, but fact is that the decal is not the Wolfsangel for which I, for some reason took it, but just half a Hakenkreuz and that the decal actually consists of two parts, making in into a proper and historical correct, yet politically incorrect, Hakenkreuz.
I was about to tear my few remaing hairs out, but in the end it worked out oké. I stashed the remainder of the decal sheet, so I was able to fix it. I had to spray gloss varnish over the weathered parts again to make sure that the second decal would go on flawless, but I managed.
Now, I understand to some extend why they left out a full and ready Hakenkreuz, although I completely disagree with this practice, but hey, it is what it is. But even in the instructions they don’t even mention this and happily depict the plane in the camo examples with that halfwit Wolfsangel. And that is beyond me, really. Rant mode off.
Here’s the story in pictures:
Before

and after (still glossy)

Signing off for today folks.
by Robert | Aug 27, 2014 | Work In Progress
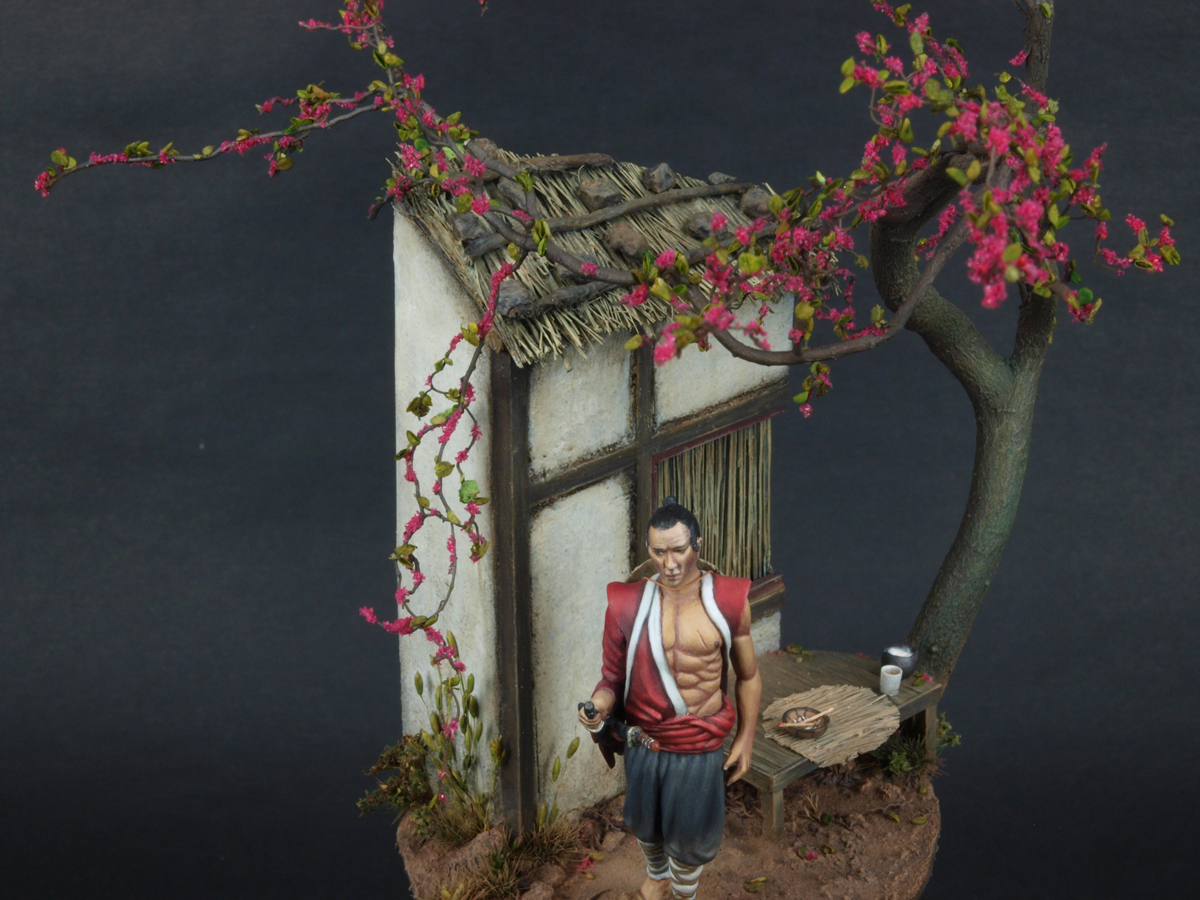
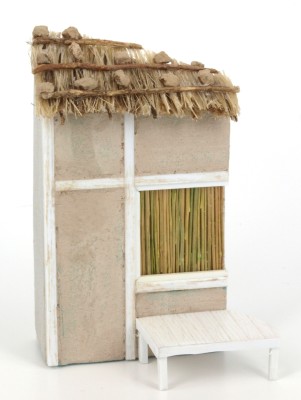
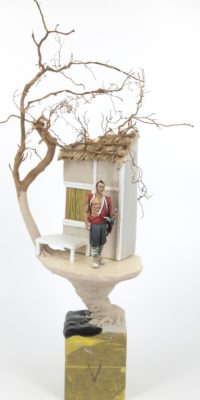
Here are some in progress pics of the Ronin project.
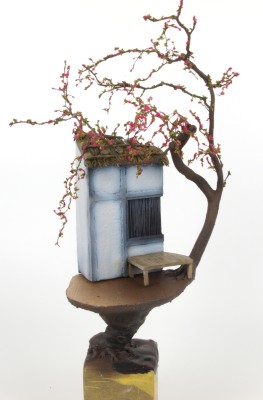
The house was made of blue HD styrofoam and Evergreen. I covered the walls with, how appropriate, wall filler and sanded it back to achieve a slightly smoother look.
The roof was fashioned from bristles from an old paint brush, and I raided my “green” box for the window covers; cutting of stems from dried “something”. No idea what, but it served the purpose.
My green box is a collection of stuff I use for my dioramas: natural and manufactured products, purchased stuff as well as all kinds of goodies I found in the garden or wherever you find useful things. Which could be everywhere you go, really.
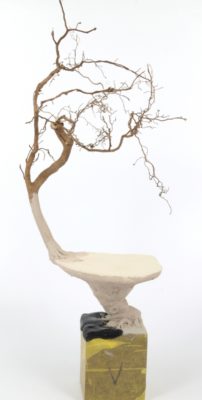
The tree is a dried root and I sculpted new roots at the bottom. I covered the sculpted area and lower part of the stem with Bark Paste from Anita Decor, a railroad brand. Kewl stuff!
The wooden base has an interesting colour pattern and has actual cracks that inspired me to fashion the base the way I did. I sculpted the “tree” leading to the actual base from Magic Sculp, wrapped around a twisted wire armature, and let the roots drape over the edges and run into some of the crevices of the wooden base.
I wanted the blossoming tree to work as a sort of natural frame for the figure, as the figure is obviously what it’s about. The scenery is merely decoré, but effectively used to “box” the figure, so to speak. My wife and I, together with some friends, were recently invited by our friends Goetz Siepmann and Nicole Siepmann-Eppinger for a weekend of figure painting, base making and to hang out. Goetz and Nicole really inspired me by their approach of making bases for their figures. So I owe them a big thank you, as this project, simple as it may seem, has made me realize that thinking out of the box is the best thing to get you any further in this wonderful hobby.

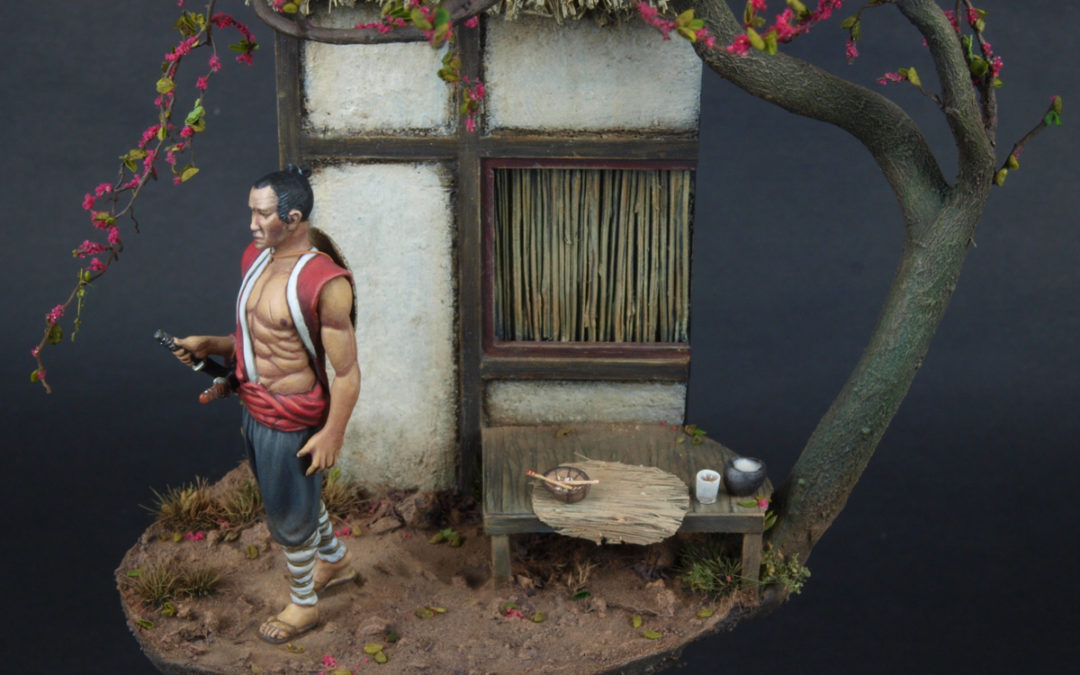
by Robert | Aug 26, 2014 | Gallery additions, Robert's Gallery
At SMC 2011 I received a gift from Raffaele Picca from Massive Voodoo, a 54mm figure of a Ronin, sculpted by him for his Forged Monkey brand.
It took me while before I got to paint it as I didn’t feel comfortable enough to do it justice. But recently I was invited , together with my wife and some friends by Goetz Siepmann and Nicole Siepmann-Eppinger, to come to their home in Essen, Germany for a weekend full of figure frenzy: painting, making bases and especially talk about figures….and most of all to have a good time. This weekend inspired me to do the base as it came out the way you can see it in the pictures. I painted everything in acrylics.
You can more images in my gallery
Hope you like it.


by Robert | Feb 11, 2014 | Show News
Perhaps a small update on Scale Model Challenge 2014 would be nice.
We launched the SMC pages on the SMF website in January. Just a week or two before we have send out the invites to a selection of vendors, and the response has been overwhelming to tell you the truth. At this point we already “sold” 70% of the available vendor space.
This year’s SMC will roughly the same size as last year’s show, but now without the addition of a simultaneous event. It basically means that we will occupy all the available halls with SMC only this year.
We have anticipated a slight increase of the competition area and at the same time more space for clubs as we noticed the increased international interest.
With Claude Joachim’s huge Clervaux as a centre point, we will introduce some new concepts and stunning displays and exhibits in the central show area.
Another addition to the show will be that, besides the demos and presentations by our exciting line up of special guests (Alex “Iguazzu” Varela, Ivan Cocker and Radek Pituch) we will give visitors the possibility to practice various skills on their own models under guidance of some of the best; a program of interactive workshops of 45-60 minutes with Jay Laverty, Kamil Feliks Sztarbala and José Brito. More names will follow, especially for the figure painters.
Behind the scenes we have been working on a revolutionary contest application that will enable us to smooth the whole contest process from pre-registration to the awards and medal presentation. I say revolutionary as this is promising to be something ultra cool. Especially for ourselves as most of the process always happens backstage, so to speak. But visitors will be able to see some of it during the day as well, especially during the registration process, in case you haven’t pre-registered. That part will be pretty revolutionary for sure and will dismiss all the paperwork that contestants always meet during shows.
This application, we baptized it MONARCH, is being tested the hard way now and we are confident about its introduction on SMC 2014….or actually from the moment pre-registration opens.
For those coming from galaxies far away, or from around the corner for that matter, we organize a day trip on Saturday 11th October to Amsterdam with different options. We did this in 2013 for the first time and the ones attending had a great time visiting the Dutch capital.
SMF member Marcel du Long has produced the artwork again, and he did a great job as always. He managed to add a WWI theme, in a subtle way. Although we are not necessarily a military modelling show (anymore), military subjects play a large role in scale modelling and we cannot let this commemorative year pass without paying attention to the fact that WWI broke out 100 years ago. We also dedicate an award to the best model or figure from that period.
I leave you with this years’ poster:

by Robert | Feb 10, 2014 | Work In Progress
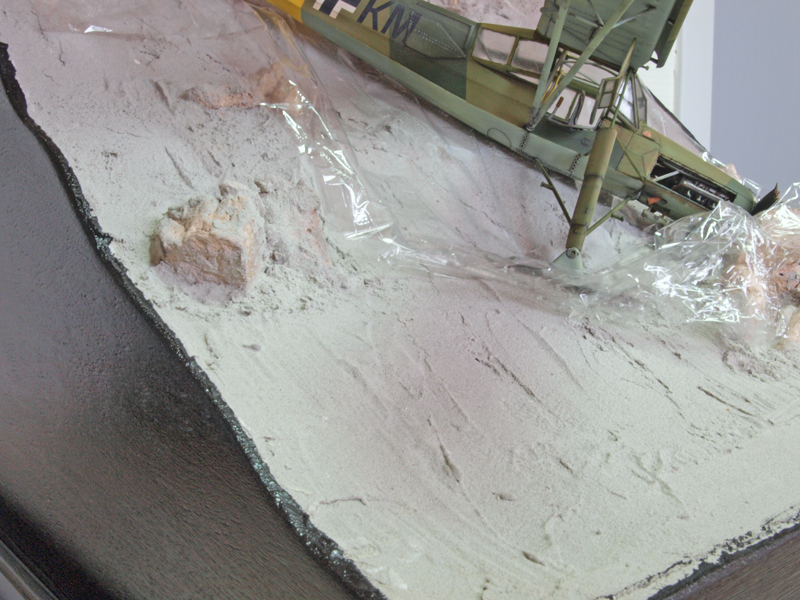
Over the past few weeks I spent some hours working on my Snow Crash diorama. My last effort to actually building something diorama-ish dates back roughly two years. And something of this size (32*42 cms surface) I can’t even recall the last time, perhaps 4-5 years ago. Working on the various elements, figures, aircraft, groundwork, planning etc. reminded me though, that building dioramas requires all the skills you’ve got.
As the title already mentioned, the Aerosan crew is done, with some slight modifications to a set by the company TANK: They still require some weathering, but I’m saving that for when the diorma is nearing final completion.


There’s no question about it: modellers do need elaborate reference material and an extensive library. Here’s why:


Several steamy nights including hot carpentry and messing about with styrofoam lead to this translation of the previously shown layout:


From Balsa wood rods, bark paste, Asparegus fern leaves, 3M Spray Mount and static grass I made two fir trees and some fir tree parts (The Storch had hit into something, remember?). Here’s the green version of one of the trees….they will become white in the end:

Roughly testing the lay out of the different elements, always an exciting job as the idea comes to life:


I also started painting the Storch..finally. Pre-shading and base coating the bottom of the fuselage and wings:


One piece of advice: Masking the canopy with bare metal foils is the best thing you can do….said no modeller ever.
I applied it months ago, left it there for much too long and found last week that it was a helluva job peeling it off, finding glue residue all over the canopy. After removing all the bare metal foil, scraping it off actually, I removed the glue residue with Revel Painta Clean (don’t ask !) and then buffed it as well as I could and decided that I actually had something quite handy available and it may not come to a surprize to aircraft modellers:

Yes indeed. Alclad’s Aqua Gloss brought back the canopy to an acceptable state, after I applied several layers with the airbrush, resulting in a look that is feasible for harsh winter conditions.
A hard lesson learned here…. After taking these images I used low tack masking tape te re-mask the canopy for futher painting.


I am going for a two-tone green camouflage for my little Storch. No white wash as I need some nice contrast to all that friggin’ white stuff, ha!
So that’s all for now folks….to be continued